Menu · 2 components
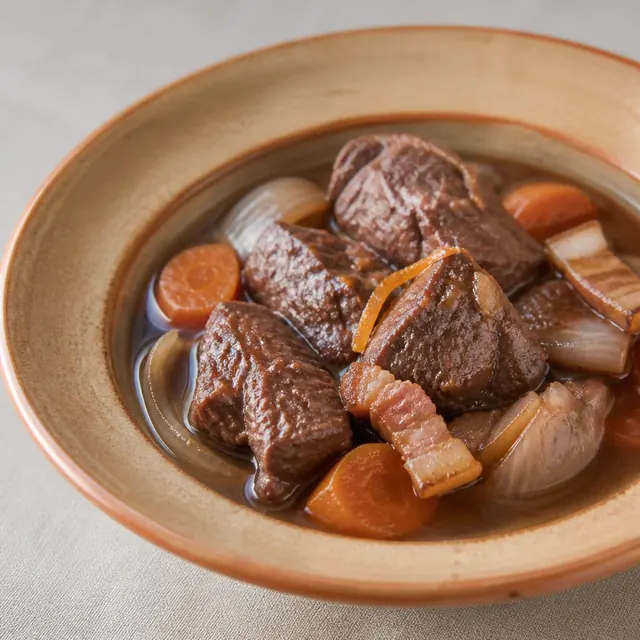
Daube provençale with a side
Provençal beef braised in red wine with herbs and orange peel, with pasta as served in Provence; mashed potatoes or polenta (half serving) are further choices.
Menu portion705 min972.7 kcal per menu portion
- Good for lunch
Less suited for dinner.
1Main course
Daube provençale
694 kcal per menu portion · 1 × recipe portion per menu portion
- Lactose free
- Gluten free
Contains: Sulphites
Quantities for the whole recipe (6 servings).
Ingredients
- 1,200 gBeef, chuck, arm pot roast, separable lean and fat, trimmed to 1/8" fat, choice, raw
- 130 gOnions, raw
- 90 gCarrots, raw
- 2 gThyme, fresh not counted – removed
- 0.4 gSpices, bay leaf not counted – removed
- 10 gParsley, fresh not counted – removed
- 8 gSalt, table
- 0.6 gSpices, pepper, black
- 0.2 gSpices, cloves, ground
- 450 mlAlcoholic beverage, wine, table, red
- 70 mlVinegar, red wine
- 120 gPork back fat (raw)
- 65 gOnions, raw
- 9 gGarlic, raw
- 3 gOrange peel, raw not counted – removed
- 300 mlBeverages, water, tap, drinking
Method
- Cut the beef into cubes of about 100 g and put them into a bowl with the quartered onion, the carrots in chunks, a bundle of herbs, the salt, pepper and a pinch of spice. Pour over 450 ml of wine and 70 ml of vinegar, cover and leave to marinate in a cool place for 5–6 hours, turning the meat now and then.
TipMarinades: acid, enzymes, yoghurtA marinade is a visit, not a move: it never gets further than the meat's front hall.Why and howShow less
Why
Most marinade ingredients penetrate only a few millimetres into the meat, even after many hours; both flavour and tenderising therefore work mainly on the surface, which is why marinating pays off most with thin slices and small pieces. Acid (lemon, vinegar, wine) and protein-splitting enzymes, for example from fresh pineapple or papaya, loosen proteins and connective tissue on the surface, but if they work too long the surface doesn't get tender – it turns mushy. Yoghurt and buttermilk are only mildly acidic and tend to be gentler on meat, while sugar and honey in a marinade help browning but burn easily on a grill or in a pan. Acid doesn't reliably kill bacteria, so marinate in the fridge, and a marinade that has been in contact with raw meat may only be used as a sauce after boiling.
How to do it
- Always marinate in the fridge, in a covered glass or stainless-steel container, or in a sealable bag.
- Leave fish and delicate meat in an acidic marinade for just 15–30 minutes, tougher cuts for a few hours, 24 hours at most.
- Let a marinade with fresh pineapple, papaya or kiwi work only briefly, never overnight.
- Set aside some marinade for a sauce before you put the raw meat in.
- Throw used marinade away, or bring it to the boil before serving.
- Pat the meat dry before cooking and wipe off a sweet marinade so it browns rather than burns.
If it goes wrong
A mushy surface after too long in an acidic or enzyme marinade can't be firmed up again; trim off the softest layer, or cut the meat into strips and stir-fry it briefly. Scrape off burnt sweet marinade and finish the meat over a gentler heat; next time add a sweet glaze only at the end.
- Drain the meat and vegetables thoroughly in a colander, catching the marinade. Reduce the marinade by half in a saucepan.
- In an earthenware daubière or a cast-iron pot, slowly melt the chopped pork fat and lift out the cracklings with a slotted spoon. Lightly brown the second onion, quartered, in the fat.
- Add the drained meat with the vegetables from the marinade and brown it well on all sides for about 15 minutes, tossing it from time to time.
TipSearing meatA seared crust seals in nothing but flavour – and for a crust, that's achievement enough.Why and howShow less
Why
The brown crust and aroma of seared meat come from the Maillard reaction, in which proteins and sugars on the surface turn into hundreds of aromatic compounds; it only gets going quickly above roughly 140 °C. As long as the surface of the meat is wet, the water holds it at around 100 °C and the meat steams instead of searing – which is why you dry the meat and get the pan and fat properly hot. Put too much meat in the pan and its temperature drops sharply, juices run out and the pieces simmer in them, grey and crustless. The idea that searing 'seals the pores' and keeps the juices in is a myth: the crust isn't watertight and seared meat loses as much juice or even more – you sear for flavour, not for juiciness.
How to do it
- Pat the surface of the meat thoroughly dry with kitchen paper.
- Heat the pan first, then add a fat that can take high heat, such as rapeseed oil or clarified butter; don't heat a non-stick pan empty on full power.
- Leave space between the pieces; if they don't fit, sear in batches.
- Leave the meat alone and don't move it until it releases by itself; if it sticks, it hasn't formed a crust yet.
- Deglaze the browned bits on the bottom of the pan with wine or stock – they are the base of a sauce.
If it goes wrong
If the meat has released its juices and is stewing, take it out, pour the juices aside, reheat the pan and sear the meat in smaller batches; then add the juices to the sauce. Grey meat that is already cooked through can't get a crust afterwards without overcooking – serve it with a sauce, and next time dry the meat and don't crowd the pan.
- Add the crushed garlic, a fresh bundle of herbs and the strip of orange peel. Pour in the reduced marinade and 300 ml of hot water, seal the pot tightly (if necessary seal the lid with foil) and braise over very low heat for 5 hours until the meat can be cut with a spoon.
TipBraising tough cutsCollagen won't be rushed: a gentle simmer turns it into gelatin, a rolling boil turns the meat into shoe leather.Why and howShow less
Why
Tough cuts such as shoulder, shin, neck or cheek contain a lot of connective tissue, and its main protein, collagen, slowly dissolves into gelatin under long, moist heat – noticeably from roughly 70 °C, and over hours, not minutes. Meanwhile the muscle fibres lose more water the hotter they get, and a hard boil tightens and wrings them out, so the meat ends up dry and stringy even while sitting in liquid. That is why you braise covered, just below the boil, with only the occasional bubble breaking the surface: the collagen has time to break down and the fibres are not heated more than they need to be. The gelatin then coats the fibres, making the meat succulent and the sauce glossy and rich; lean cuts with little connective tissue, such as pork tenderloin, only dry out with long braising because they lack the collagen that would rescue them.
How to do it
- Choose cuts with sinew and connective tissue for braising: shoulder, shin, neck, cheeks or oxtail.
- Brown the meat well first, then add liquid to come only about halfway up the meat.
- Keep it at a bare simmer, with the surface barely trembling; in a covered pot in the oven, about 140–160 °C is plenty.
- Test for doneness with a fork, not the clock: the meat is ready when it pulls apart easily.
- Let the cooked meat cool a little in its liquid: the surface won't dry out and the gelatin-rich juices will coat it.
If it goes wrong
Tough meat is almost always underbraised: add a splash of liquid and keep it at a gentle simmer until it softens. Meat that has boiled into dry strands won't become juicy again; shred it, moisten it with the sauce and serve it as a ragù or filling. Next time, lower heat and more time.
- Before serving, skim the fat off the surface and remove the herb bundles and orange peel. Serve hot straight from the pot.
2Side dish
Cooked pasta (shop-bought) traditional
278 kcal per menu portion · 1 × recipe portion per menu portion
- Vegan
- Lactose free
Contains: Gluten · May contain: Egg
Quantities for the whole recipe (4 servings).
Shown: ready-made product Cooked pasta (shop-bought).
or:
- French mashed potatoes (pommes purée) · 394 kcal per menu portion
- Polenta · 185 kcal per menu portion
Ingredients
- 300 gPasta, dry, enriched
- 2 gSalt, table editorial addition
Method
- Bring a large pot of water to a boil and add 20 g salt.
- Add pasta and cook according to the packet until al dente.
TipCooking pastaPasta water isn't waste, it's liquid glue that talks the sauce into clinging to the pasta.Why and howShow less
Why
In the first minutes of boiling, starch is released from the surface of the pasta and it turns sticky; plenty of rapidly boiling water and a stir at that point stop it clumping, and the water doesn't cool down as much when the pasta goes in. Salt only gets into pasta while it cooks, which is why the water is salted generously, roughly 10 g per litre; that amount has a negligible effect on the boiling point, and oil in the water is pointless because it floats on top and doesn't prevent sticking. The cooking water is full of dissolved starch that thickens the sauce and helps its fat combine with water into a smooth emulsion that clings to the pasta. That is why pasta isn't rinsed after draining – you would wash off the starch the sauce holds on to and cool the pasta down; the only exception is pasta for a cold salad.
How to do it
- Allow roughly a litre of water per 100 g of pasta and add about 10 g of salt per litre once it boils.
- Drop the pasta into rapidly boiling water and stir now and then for the first two minutes.
- Don't add oil to the water; it won't stop sticking.
- Cook a minute or two less than the packet says and keep tasting.
- Before draining, scoop out a mugful of the cooking water.
- Don't rinse the pasta; transfer it straight into the sauce and finish cooking it there with a little of the cooking water.
If it goes wrong
Loosen pasta that has stuck together in the sauce with a little hot cooking water, or dip it briefly in boiling water and stir. Overcooked pasta won't firm up again – bake it or add it to a soup, and next time start tasting earlier. Under-salted pasta can only be rescued by a well-seasoned sauce.
- Drain pasta; do not use the drained water as sauce.
Alternative: French mashed potatoes (pommes purée)
Ingredients
- 1,000 gPotatoes, flesh and skin, raw
- 200 gButter, without salt
- 250 mlMilk, whole, 3.25% milkfat, with added vitamin D
- 8 gSalt, table
- 2 lBeverages, water, tap, drinking not counted – removed
- 2 gSalt, table editorial addition
Method
- Wash potatoes of even size, put them in a pot in their skins, cover with 2 litres of cold water with 20 g of salt and bring to the boil. Simmer for about 25 minutes until a knife slides in without resistance.
- Drain the potatoes and peel them while still hot, holding them in a cloth. Immediately pass them through a food mill with a fine disc or a potato ricer into a saucepan. Never use a blender: broken cells release starch and the purée turns gluey.
- Set the pan over low heat and stir the purée with a wooden spoon for 4–5 minutes to drive off moisture; it must not catch. Meanwhile bring 250 ml of milk to the boil.
- Vigorously work 200 g of cold diced butter into the purée a little at a time and add 8 g of salt. Then pour in the boiling milk in a thin stream while stirring constantly, and finally whisk the purée until smooth. Heat it through without boiling and serve at once.
Alternative: Polenta
Ingredients
- 400 gCornmeal, degermed, unenriched, yellow
- 1.4 lBeverages, water, tap, drinking
- 6 gSalt, table
Method
- Bring water and salt to a boil in a heavy-based pan.
- Pour cornmeal in a thin stream while stirring constantly so no lumps form.
TipGrain porridges: semolina, polenta, oats, milletPorridge looks thin in the pot, but on the plate it soon turns into a brick: cook it a little thinner than you want to eat it.Why and howShow less
Why
Semolina, cornmeal and oats are mostly starch, and when they are tipped into hot milk or water all at once, the surface of each clump gelatinises instantly and traps dry flour inside as a lump, just as in thickening (Thickening with starch card); that is why they are poured in a thin stream while whisking constantly. Fine semolina softens in a few minutes, classic polenta from coarse cornmeal needs half an hour to an hour depending on the grind, and porridge cooked too briefly tastes raw and floury. Oats make porridge creamy thanks to beta-glucans, a soluble fibre that thickens the liquid, and every porridge thickens considerably as it cools, because the starch sets again. Milk and starch easily scorch on the bottom, so porridge is cooked in a heavy-bottomed pot over gentle heat and stirred right down to the bottom. Spores of the bacterium Bacillus cereus can survive in cooked grains, and when porridge cools slowly in the warm, they germinate and can form a toxin that later reheating does not destroy.
How to do it
- Bring the liquid almost to the boil and pour in the semolina or cornmeal in a thin stream while whisking constantly.
- Cook over gentle heat in a heavy-bottomed pot and stir right down to the bottom; polenta only needs stirring every few minutes, semolina and oats more often.
- Cook porridge a little thinner than you want to serve it; it will thicken further on the plate.
- Rinse millet with hot water before cooking and taste it; throw out millet that is bitter or rancid when dry, rinsing won't fix it.
- Leftover polenta or semolina porridge can be poured into a tin, left to set, sliced and fried.
- Spread leftover porridge in a shallow container and refrigerate it within 2 hours; rice congee within 1 hour, like cooked rice.
If it goes wrong
Whisk out lumps or blend them with an immersion blender; push large lumps through a sieve. Loosen set porridge with a little hot milk or water and heat it until piping hot throughout, stirring constantly. Pour scorched porridge straight into a clean pot without scraping the bottom; if it already tastes burnt, it can't be saved. Porridge that tastes raw and floury just needs a few more minutes of cooking and a little liquid.
- Simmer 30 minutes at 90 °C and stir every 3 minutes; finished polenta releases from the pan sides.
TipGrain porridges: semolina, polenta, oats, milletPorridge looks thin in the pot, but on the plate it soon turns into a brick: cook it a little thinner than you want to eat it.Why and howShow less
Why
Semolina, cornmeal and oats are mostly starch, and when they are tipped into hot milk or water all at once, the surface of each clump gelatinises instantly and traps dry flour inside as a lump, just as in thickening (Thickening with starch card); that is why they are poured in a thin stream while whisking constantly. Fine semolina softens in a few minutes, classic polenta from coarse cornmeal needs half an hour to an hour depending on the grind, and porridge cooked too briefly tastes raw and floury. Oats make porridge creamy thanks to beta-glucans, a soluble fibre that thickens the liquid, and every porridge thickens considerably as it cools, because the starch sets again. Milk and starch easily scorch on the bottom, so porridge is cooked in a heavy-bottomed pot over gentle heat and stirred right down to the bottom. Spores of the bacterium Bacillus cereus can survive in cooked grains, and when porridge cools slowly in the warm, they germinate and can form a toxin that later reheating does not destroy.
How to do it
- Bring the liquid almost to the boil and pour in the semolina or cornmeal in a thin stream while whisking constantly.
- Cook over gentle heat in a heavy-bottomed pot and stir right down to the bottom; polenta only needs stirring every few minutes, semolina and oats more often.
- Cook porridge a little thinner than you want to serve it; it will thicken further on the plate.
- Rinse millet with hot water before cooking and taste it; throw out millet that is bitter or rancid when dry, rinsing won't fix it.
- Leftover polenta or semolina porridge can be poured into a tin, left to set, sliced and fried.
- Spread leftover porridge in a shallow container and refrigerate it within 2 hours; rice congee within 1 hour, like cooked rice.
If it goes wrong
Whisk out lumps or blend them with an immersion blender; push large lumps through a sieve. Loosen set porridge with a little hot milk or water and heat it until piping hot throughout, stirring constantly. Pour scorched porridge straight into a clean pot without scraping the bottom; if it already tastes burnt, it can't be saved. Porridge that tastes raw and floury just needs a few more minutes of cooking and a little liquid.
Allergens
Contains: Gluten, Sulphites
May contain: Egg
Derived from ingredients – check the package label.
Nutrition, allergens and calories are for the default choice – the first alternative of every slot.
Nutrition per menu portion
Per serving
- Protein49.3 g21%
- Fat56.1 g53%
- Total carbohydrate (by difference)63 g26%
Share of energy from protein, fat and carbohydrate (4 / 9 / 4 kcal per g), not share by weight.
- Energy
- 972.7 kcal
- Protein
- 49.3 g
- Fat
- 56.1 g
- Total carbohydrate (by difference)
- 63 g
- Total dietary fibre (USDA)
- 3.4 g
- Saturated fatty acids
- 21.7 g
- Sodium
- 861.2 mg
- Salt (sodium × 2.5)
- 2.2 g
Per 100 g
- Energy
- 209.9 kcal
- Protein
- 10.6 g
- Fat
- 12.1 g
- Total carbohydrate (by difference)
- 13.6 g
- Total dietary fibre (USDA)
- 0.74 g
- Saturated fatty acids
- 4.7 g
- Sodium
- 185.9 mg
- Salt (sodium × 2.5)
- 0.46 g
A dash means the value is unknown, not zero. Salt is calculated from sodium (g salt = mg sodium × 2.5 / 1000) and includes sodium from all ingredients.
Calculation limitations
- Nutrition is a calculated estimate, not a laboratory measurement.
- Some ingredient quantities use documented estimates or household-measure assumptions.
- The number of servings is an editorial estimate (midpoint of the source range or based on the dish type and energy).
- Some specific ingredients are represented by the closest generic food with the same culinary function.
- Fibre, saturated fat and sodium of cooked ingredients are estimated from the consumed ingredient amounts; for drained ingredients, sodium is included only where the retained amount is an explicit editorial estimate.
- Alcohol remaining after cooking is estimated from USDA retention factors by cooking method and time; energy excludes the evaporated alcohol.
- Some process effects could not be resolved in this calculation.
- Menu nutrition is the sum of its component recipes, each scaled to one menu portion.