Menu · 2 components
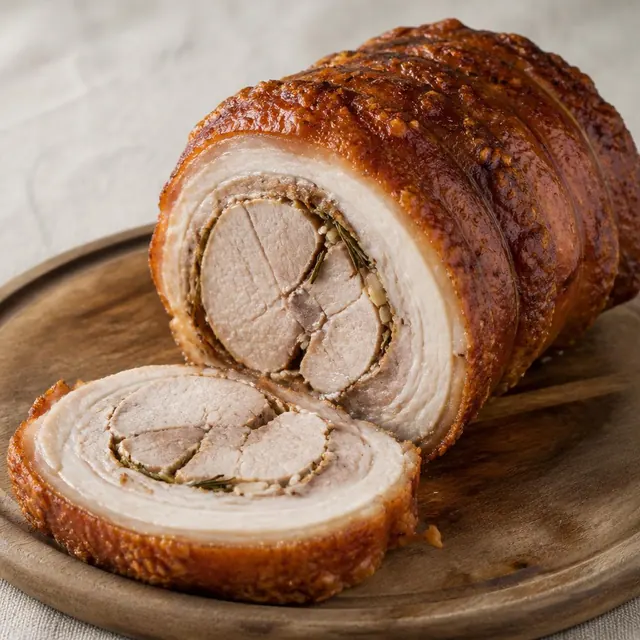
Porchetta with a side
Slices of roast pork porchetta with Genoese focaccia; polenta (half serving) or peperonata are further choices.
Menu portion1365 min1,059.7 kcal per menu portion
- Good for lunch
Less suited for dinner.
1Main course
Porchetta
723 kcal per menu portion · 1 × recipe portion per menu portion
- Lactose free
- Gluten free
Contains none of the 14 main allergens.
Quantities for the whole recipe (13 servings).
Ingredients
- 1,500 gPork, fresh, belly, raw
- 1,000 gPork, fresh, loin, top loin (chops), boneless, separable lean and fat, raw
- 50 gSalt, table
- 8 gSpices, pepper, black
- 15 gRosemary, fresh
- 25 gGarlic, raw
Method
- Lay the belly skin side down and score the meat side in a crosshatch about 1 cm deep with a sharp knife. Turn it over and score the skin at intervals of about 1 cm, cutting only into the fat, not the meat.
- Finely chop the garlic and rosemary and mix with 8 g of coarsely crushed pepper. Salt the meat side of the belly and the loin on all sides (50 g of salt in total, i.e. 20 g per kilogram of meat, with only a thin layer on the skin) and rub in the herb mixture.
- Place the loin along one edge of the belly and roll the belly tightly around it, skin side out, so that the edges of the skin meet. Tie the roll firmly with kitchen string every 2–3 cm.
- Set the roll on a rack over a tray and leave it uncovered in the fridge for 12–24 hours so the skin dries out.
- Take the roll out of the fridge an hour beforehand. Heat the oven to 160 °C, set the roll on a rack over a roasting tin and roast for 3.5–4.5 hours until the internal temperature in the belly reaches about 85 °C. The rendered fat drips into the tin and is not served.
- Raise the temperature to 230 °C and roast for 10–15 minutes until the skin blisters and turns crisp. Watch it so that it does not start to blacken.
TipRoast pork and cracklingPork rind is like popcorn: it needs water inside, fierce heat and above all a break from basting.Why and howShow less
Why
Pork rind is largely tough collagen plus water: in high, dry heat the water in it evaporates rapidly and forms tiny bubbles, so the rind puffs up and crackles. The Bavarian tradition first softens the rind in moist heat, scalding it or roasting it rind-side down in a little water for a while, and only then roasts it rind-side up in dry heat; the British way instead dries it in the fridge beforehand, and in both cases scoring in a diamond pattern and salt help release fat and moisture. Adding liquid and basting with pan juices keep the meat moist but soften crackling that has started to crisp, so liquid belongs at the side of the tin, not on the rind – meat without rind can be basted. Shoulder and belly have enough fat and collagen for long roasting; lean leg or loin dries out in the same time and needs only a shorter roast to the required internal temperature.
How to do it
- Roast rind-side down in a little water or covered first, so the rind softens, then turn the meat rind-side up.
- Score the softened rind in a diamond pattern with a sharp knife, into the fat but not the meat, then pat it dry and salt it.
- From then on, pour no water or juices over the rind; if the bottom of the tin dries out and starts to burn, add liquid at the side.
- At the end, raise the oven to about 220–250 °C or switch on the oven grill and watch until the rind blisters; with the grill it usually takes 5–15 minutes.
- Check the internal temperature at the thickest point: the UK FSA gives 70 °C for 2 minutes, the US USDA 63 °C and 3 minutes of rest.
If it goes wrong
Rubbery crackling can be rescued: cut off the rind, lay it loose on a tray in a hot oven or under the oven grill and watch until it blisters; meanwhile let the meat rest, covered. Slice dried-out meat thinly and serve it with the pan juices. Next time don't baste the rind after turning.
- Let the porchetta rest on a board for at least 30 minutes. Remove the string and carve with a sharp knife into slices about 1 cm thick. Serve warm or cold, traditionally sliced in bread.
2Side dish
Focaccia genovese traditional
337 kcal per menu portion · 1 × recipe portion per menu portion
- Vegan
- Lactose free
Contains: Gluten
Quantities for the whole recipe (6 servings).
or:
- Polenta · 185 kcal per menu portion
- Peperonata · 247 kcal per menu portion
Ingredients
- 335 gWheat flour, white, bread, enriched
- 185 mlBeverages, water, tap, drinking
- 1.5 15 ml tablespoonOil, olive, salad or cooking
- 5 gLeavening agents, yeast, baker's, compressed
- 8 gSalt, table
- 7 gSyrups, corn, light
- 2 5 ml teaspoonOil, olive, salad or cooking
- 75 mlBeverages, water, tap, drinking
- 55 mlOil, olive, salad or cooking
- 6 gSalt, table
- 2 5 ml teaspoonOil, olive, salad or cooking
Method
- Dissolve 5 g of yeast and 7 g of malt syrup in 185 ml of lukewarm water. Add the flour and mix until it comes together, then add 8 g of salt and gradually work in 1½ tbsp olive oil. Knead for about 10 minutes until the dough is smooth and elastic.
TipYeast doughYeast is only human: cosy warmth gets it working, real heat finishes it off, and in the cold it just dawdles.Why and howShow less
Why
The yeast cells break down sugars from the flour into carbon dioxide and alcohol; the gas, trapped in the gluten network, inflates the dough, while the by-products give it flavour. They work best at roughly 25–35 °C, slow down in the cold without dying, and begin to die from about 50–55 °C, so milk that is too hot kills the yeast before the dough ever reaches the oven. Salt slows fermentation and strengthens the gluten; plenty of sugar draws water away from the yeast and plenty of fat coats it, so sweet, buttery yeast doughs take longer to rise. A longer, cooler rise, such as overnight in the fridge, gives the dough more flavour, whereas over-proofed dough runs out of strength, collapses and smells sour and boozy.
How to do it
- Warm the milk or water only until lukewarm, about body temperature – it mustn't feel hot on your wrist.
- Stir fresh yeast with a little lukewarm liquid, a teaspoon of sugar and some flour, and let the starter get going.
- Mix the salt into the flour, not straight into the starter.
- Leave the dough to rise covered in a warm, draught-free spot until it has roughly doubled in size.
- Give sweet doughs rich in butter and sugar more time to rise, or add a little more yeast.
- Check the rise with a finger: the dent should spring back slowly; if it stays, the dough is over-proofed.
If it goes wrong
If the starter didn't bubble, the yeast was old or scalded – make a new one with fresh yeast. Dough that won't rise should go somewhere warmer (not directly on a radiator) and be given time. Knock back over-proofed dough briefly, shape it and let it rise again for a short while; it will be a little denser, but it will still bake.
TipKneading and glutenGluten is the dough's gym: give bread a proper workout, and let sponge cakes and pancakes put their feet up.Why and howShow less
Why
When wheat flour meets water, its proteins gliadin and glutenin link up into gluten, and kneading stretches and aligns these chains into a springy, extensible network. In bread and yeast doughs a strong network is exactly what you want: it traps the gas from fermentation, the dough rises and the crumb is springy. In shortcrust pastry, sponge cake, pancakes or muffins the same network does damage – the result is tough and rubbery, muffins develop tunnels and pastry shrinks in the oven. Fat coats the flour particles and sugar holds on to water, so both hold back gluten formation; that's why such mixtures are only briefly combined and small lumps are left in. Resting relaxes the gluten, so the dough then rolls out more easily and shrinks less.
How to do it
- Knead bread dough by hand for about 10 minutes, until smooth and elastic and it stretches into a thin membrane without tearing.
- Stir pancake and muffin batters only briefly, until no dry flour remains – small lumps are fine.
- Bring shortcrust together quickly, with cold butter and cool hands, and simply press it into a ball.
- Fold the flour into a sponge mixture last and gently with a spatula, lifting from the bottom.
- If dough springs back as you roll it, cover it and let it rest for 10–20 minutes.
If it goes wrong
Wrap overworked pastry and chill it for at least half an hour: the gluten relaxes and the fat firms up, so it shrinks less in the oven, though it will be a little tougher. Let overmixed pancake batter rest for 15–30 minutes before cooking; that will at least ease the toughness. A tough baked sponge or muffin can't be fixed – mix less next time.
- Round the dough, cover it and leave it to rise for 1 hour at room temperature. For a deeper flavour you can then let it mature in the fridge for 24 hours; let it come back to room temperature for an hour before the next step.
- Grease a 30 × 40 cm tray with 2 tsp of olive oil, transfer the dough to it and gently stretch it into the corners with your fingers. If it springs back, let it rest for 10 minutes and continue; it must not tear.
- Cover the dough and let it rise for 60 minutes at 28–30 °C, for example in a switched-off oven with the light on.
- Whisk the salamoia: 75 ml of lukewarm water, 55 ml of olive oil and 6 g of salt. Press dimples close together into the dough with your fingertips almost down to the tray and pour the brine evenly over it so that it pools in the dimples.
- Leave the focaccia to rise uncovered for another 90–120 minutes at 28–30 °C. Meanwhile heat the oven to 240 °C (top and bottom heat, no fan).
- Bake in the lower third of the oven for 14–15 minutes until the top is golden and the base firm and golden; the dimples stay paler and soft.
TipBaking bread and rollsBread needs steam and patience: steam at the start lets it rise, and waiting until it cools before slicing spares you a gummy crumb.Why and howShow less
Why
In the first minutes of baking the gas and steam in the dough expand with the heat and the loaf keeps rising; moisture in the oven keeps the surface soft and supple, so the crust does not set before the bread has risen, and the starch on the surface gelatinises, giving the crust shine and a deeper colour. According to King Arthur Baking, steam is needed only at the start, while the loaf is still rising, roughly the first 15–20 minutes; moisture throughout the bake gives a thick, rubbery crust. Inside, bread bakes until the starch has gelatinised and the proteins have set: America's Test Kitchen gives about 93–99 °C in the centre for lean breads and about 88–91 °C for breads with butter and eggs, but regards a sufficiently dark, well-baked crust as the more reliable sign. As the bread cools, steam keeps leaving the crumb and the gelatinised starch firms up, which is why a loaf cut hot is gummy and dense rye bread needs the longest time to cool.
How to do it
- Preheat the oven in good time, ideally with a baking sheet or cast-iron pot inside, and put the bread in only once it is fully hot.
- Score the loaf with a sharp knife just before baking; the cut decides where the bread expands, so it does not burst at random.
- Give the bread steam at the start: put a tray or dish of hot water on the oven floor, or bake the loaf under a lid for the first 20 minutes.
- After roughly 15–20 minutes, once the loaf stops rising, take out the water or lift off the lid so the crust dries and browns; beware of hot steam when you open the oven.
- Judge doneness by the colour of the crust, with a thermometer in the centre of the loaf; bake a pale loaf longer, even out of its tin for the last 10 minutes.
- Cool the bread on a rack, a loaf for at least 2 hours and dense rye bread longer; rolls cool faster.
If it goes wrong
If the bread is sticky and raw inside when cut, put it back in the oven for about 10–15 minutes at 180 °C and let it cool completely; an underbaked loaf finishes baking this way, while a crumb that was merely cut too hot will dry out a little. Finish a pale crust for a few minutes directly on the oven rack. A crust that is too hard softens if the bread cools wrapped in a tea towel. Sprinkle stale bread with water and put it in a hot oven for 5–10 minutes.
- Brush the hot focaccia with 2 tsp of olive oil straight away, move it to a wire rack and let it cool briefly. Cut into 6 rectangles; serve lukewarm or at room temperature.
Alternative: Polenta
Ingredients
- 400 gCornmeal, degermed, unenriched, yellow
- 1.4 lBeverages, water, tap, drinking
- 6 gSalt, table
Method
- Bring water and salt to a boil in a heavy-based pan.
- Pour cornmeal in a thin stream while stirring constantly so no lumps form.
TipGrain porridges: semolina, polenta, oats, milletPorridge looks thin in the pot, but on the plate it soon turns into a brick: cook it a little thinner than you want to eat it.Why and howShow less
Why
Semolina, cornmeal and oats are mostly starch, and when they are tipped into hot milk or water all at once, the surface of each clump gelatinises instantly and traps dry flour inside as a lump, just as in thickening (Thickening with starch card); that is why they are poured in a thin stream while whisking constantly. Fine semolina softens in a few minutes, classic polenta from coarse cornmeal needs half an hour to an hour depending on the grind, and porridge cooked too briefly tastes raw and floury. Oats make porridge creamy thanks to beta-glucans, a soluble fibre that thickens the liquid, and every porridge thickens considerably as it cools, because the starch sets again. Milk and starch easily scorch on the bottom, so porridge is cooked in a heavy-bottomed pot over gentle heat and stirred right down to the bottom. Spores of the bacterium Bacillus cereus can survive in cooked grains, and when porridge cools slowly in the warm, they germinate and can form a toxin that later reheating does not destroy.
How to do it
- Bring the liquid almost to the boil and pour in the semolina or cornmeal in a thin stream while whisking constantly.
- Cook over gentle heat in a heavy-bottomed pot and stir right down to the bottom; polenta only needs stirring every few minutes, semolina and oats more often.
- Cook porridge a little thinner than you want to serve it; it will thicken further on the plate.
- Rinse millet with hot water before cooking and taste it; throw out millet that is bitter or rancid when dry, rinsing won't fix it.
- Leftover polenta or semolina porridge can be poured into a tin, left to set, sliced and fried.
- Spread leftover porridge in a shallow container and refrigerate it within 2 hours; rice congee within 1 hour, like cooked rice.
If it goes wrong
Whisk out lumps or blend them with an immersion blender; push large lumps through a sieve. Loosen set porridge with a little hot milk or water and heat it until piping hot throughout, stirring constantly. Pour scorched porridge straight into a clean pot without scraping the bottom; if it already tastes burnt, it can't be saved. Porridge that tastes raw and floury just needs a few more minutes of cooking and a little liquid.
- Simmer 30 minutes at 90 °C and stir every 3 minutes; finished polenta releases from the pan sides.
TipGrain porridges: semolina, polenta, oats, milletPorridge looks thin in the pot, but on the plate it soon turns into a brick: cook it a little thinner than you want to eat it.Why and howShow less
Why
Semolina, cornmeal and oats are mostly starch, and when they are tipped into hot milk or water all at once, the surface of each clump gelatinises instantly and traps dry flour inside as a lump, just as in thickening (Thickening with starch card); that is why they are poured in a thin stream while whisking constantly. Fine semolina softens in a few minutes, classic polenta from coarse cornmeal needs half an hour to an hour depending on the grind, and porridge cooked too briefly tastes raw and floury. Oats make porridge creamy thanks to beta-glucans, a soluble fibre that thickens the liquid, and every porridge thickens considerably as it cools, because the starch sets again. Milk and starch easily scorch on the bottom, so porridge is cooked in a heavy-bottomed pot over gentle heat and stirred right down to the bottom. Spores of the bacterium Bacillus cereus can survive in cooked grains, and when porridge cools slowly in the warm, they germinate and can form a toxin that later reheating does not destroy.
How to do it
- Bring the liquid almost to the boil and pour in the semolina or cornmeal in a thin stream while whisking constantly.
- Cook over gentle heat in a heavy-bottomed pot and stir right down to the bottom; polenta only needs stirring every few minutes, semolina and oats more often.
- Cook porridge a little thinner than you want to serve it; it will thicken further on the plate.
- Rinse millet with hot water before cooking and taste it; throw out millet that is bitter or rancid when dry, rinsing won't fix it.
- Leftover polenta or semolina porridge can be poured into a tin, left to set, sliced and fried.
- Spread leftover porridge in a shallow container and refrigerate it within 2 hours; rice congee within 1 hour, like cooked rice.
If it goes wrong
Whisk out lumps or blend them with an immersion blender; push large lumps through a sieve. Loosen set porridge with a little hot milk or water and heat it until piping hot throughout, stirring constantly. Pour scorched porridge straight into a clean pot without scraping the bottom; if it already tastes burnt, it can't be saved. Porridge that tastes raw and floury just needs a few more minutes of cooking and a little liquid.
Alternative: Peperonata
Ingredients
- 700 gPeppers, sweet, red, raw
- 300 gPeppers, sweet, green, raw
- 300 gOnions, raw
- 600 gTomatoes, red, ripe, canned, packed in tomato juice
- 65 mlOil, olive, salad or cooking
- 1.5 15 ml tablespoonVinegar, distilled
- 6 gSalt, table
Method
- Seed red and green peppers and cut into 1 cm strips. Slice onion into half-moons and coarsely chop tomatoes with their juices.
- Heat olive oil in a wide pot to 160 °C and soften onion slowly for 8 minutes without browning it.
- Add both peppers, tomatoes, salt and vinegar. Braise covered at 95 °C for 20 minutes, then uncover and reduce for 12 minutes more.
TipTomatoes, tomato paste and acidityTomatoes have character: raw paste is sharp and sour, but a few minutes in fat give it a rounded flavour.Why and howShow less
Why
Tomato paste is concentrated tomato flesh with plenty of sugars and acids; briefly fried in fat, some of the sugars brown and the raw, sharply sour taste turns full and rounded, but it must be stirred, because it scorches easily on a dry pan base. Long simmering, fat, cream or a little sugar soften a sharp sauce; sugar doesn't neutralise the acid, though, it only balances it on the palate. Baking soda really does neutralise acid, but in tests it made the sauce taste flat, and larger amounts foam and taste soapy, so a pinch at most. Acid firms up the cell walls of vegetables and pulses, so beans, chickpeas and potatoes soften more slowly in tomato sauce. Acidic food doesn't belong in uncoated aluminium: the German BfR advises against cooking or storing acidic and salty food, such as tomato purée, in uncoated aluminium pots, because aluminium migrates into it; with cast iron, manufacturers say long cooking of acidic food strips the protective seasoning.
How to do it
- Stir the paste into hot fat and fry it for a few minutes, stirring constantly, until it darkens and smells sweet; then add liquid at once.
- Simmer a sour sauce for longer and round it off with fat or cream; add sugar little by little and taste.
- Use baking soda only as an exception, a pinch per pot at most, and let it fizz out before tasting.
- Cook beans, chickpeas and potatoes until tender first, or allow longer cooking in the sauce – see the Cooking pulses card.
- Cook and store tomato sauces in stainless steel, enamel or glass, not in uncoated aluminium or new, lightly seasoned cast iron.
If it goes wrong
Paste that has scorched on the base won't lose that taste: pour the sauce into a clean pot without scraping and start again with a fresh batch. An overly sour sauce is saved by longer simmering, a knob of butter or a spoonful of cream. Dilute a sauce that tastes soapy after soda with canned tomatoes and leave the soda out next time.
- Serve when peppers are tender but not collapsed and tomato juices coat the vegetables. All oil remains in the side dish.
Allergens
Contains: Gluten
Derived from ingredients – check the package label.
Nutrition, allergens and calories are for the default choice – the first alternative of every slot.
Nutrition per menu portion
Per serving
- Protein34.3 g13%
- Fat82.4 g71%
- Total carbohydrate (by difference)42.8 g16%
Share of energy from protein, fat and carbohydrate (4 / 9 / 4 kcal per g), not share by weight.
- Energy
- 1,059.7 kcal
- Protein
- 34.3 g
- Fat
- 82.4 g
- Total carbohydrate (by difference)
- 42.8 g
- Total dietary fibre (USDA)
- 1.8 g
- Saturated fatty acids
- 26.4 g
- Sodium
- 2,473.8 mg
- Salt (sodium × 2.5)
- 6.2 g
Per 100 g
- Energy
- 490.8 kcal
- Protein
- 15.9 g
- Fat
- 38.2 g
- Total carbohydrate (by difference)
- 19.8 g
- Total dietary fibre (USDA)
- 0.82 g
- Saturated fatty acids
- 12.2 g
- Sodium
- 1,145.8 mg
- Salt (sodium × 2.5)
- 2.9 g
A dash means the value is unknown, not zero. Salt is calculated from sodium (g salt = mg sodium × 2.5 / 1000) and includes sodium from all ingredients.
Calculation limitations
- Nutrition is a calculated estimate, not a laboratory measurement.
- Some ingredient quantities use documented estimates or household-measure assumptions.
- The number of servings is an editorial estimate (midpoint of the source range or based on the dish type and energy).
- Some specific ingredients are represented by the closest generic food with the same culinary function.
- Fibre, saturated fat and sodium of cooked ingredients are estimated from the consumed ingredient amounts; for drained ingredients, sodium is included only where the retained amount is an explicit editorial estimate.
- Some process effects could not be resolved in this calculation.
- Menu nutrition is the sum of its component recipes, each scaled to one menu portion.